The best application for creating an automatic slideshow
We take lots of pictures, but when do we see them?
Today people make pictures and videos more and more. The only problem is with watching them that is not so easy. There are a lot of pictures, some duplicates, others crackled. When we try to see them, it's not that easy.
An alternative way to watch pictures and videos.
The method I'm suggesting is to create a slideshow of video with background music that will make it more enjoyable to watch a holiday picture.
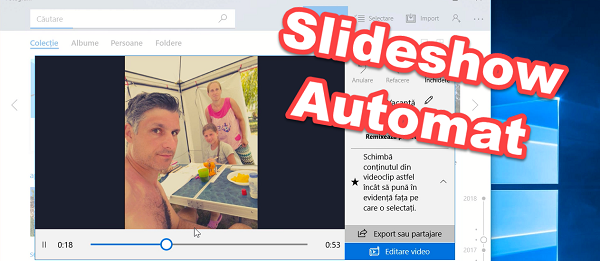
With the Windows 10 photo application, it's easier than ever to make a slideshow (video editing) almost professionally, with little experience.
The advantages of a video slideshow.
1. You do not have to distribute a bunch of pictures with your friends or family. A single photo-mount with background music will be the only file he has to view.
2. Once combined with video and music, everything will catch a more engaging air that will make you feel excited from the first few seconds.
3. An excellent method of putting in a multimedia fit all the pictures taken on a vacation.
4. Very good for the end of the school year or the school thresholds (primary, secondary, etc.)
The Windows 10 Photos app is a 10 note.
As opposed to Windows Movie Maker, the Photos application is more automated. Practically you do not have to know where the pictures and video files are, the rest of the application is.
The result is one over expectations, for good!
How the Photos application makes a slideshow video
Once you've put all the pictures and videos that will be part of the slide, in a folder, we get to work. In fact, not us, it's the application, it's working. All you have to do is where the pictures are and select them, the rest is automatic.
It will make a multimedia fitting, a synchronized video slideshow on the music, moving pictures, color effects and more.
If you want, you can get out of the car mode.
For those who will absolutely control the application, you can switch to semi manual mode, which gives you more options. This option, however, should be used only if you know what you are doing, otherwise the result will not be better than the auto mode.
tips:
1. To get the most out of the app, just extract the important video sequences as in the tutorial this
2. At first, use auto mode until you get familiar with the application.
3. Try making / using pictures taken in landscape mode (horizontally)
Related Tutorials:
The best application for creating an automatic video slideshow - video tutorial


Thank you !
Thank you, Cristian!
You visited the Tower of Chindia.
Yeah, it's a place worth visiting. It's part of our history.
For, or in Windows 7… ???
Hard to pronounce English…
What to ask from young people today if the most educated among us are not able to use English correctly.
Mr. Cristian, I apologize in advance because I know that my question has nothing to do with these video tutorials, but I don't know what to do. I wanted to reinstall Windows 10 again without deleting the other partitions, but only the system partition, but I encountered this problem: “Windows cannot be installed to this disk. the selected disk has an MBR partition table. On EFI system, Windows can only be installed to GPT disk ”Thank you!
Windows 10 needs GPT formatting. It goes on the MBR, but only under certain conditions.
The best idea is that you are doing a reset on a disk with unallocated space to make it the GPT disk itself, and the partitions.
You can also install Windows 10 on MBR if you go from UEFI to Legacy mode in bios. UEFI only works on GPT.
Whatever you try, it's good to save your important data on that disk on another external drive so you can be sure.
Save your personal data: pictures, movies, kits, games. I could not start at all in Windows 10. I installed win 7 to save all important data to an external hdd, then I could not install it because I needed a GPT formatted partition. (If you can not install win 7 uses a stick with linux or cd with linux to save your personal data). Give a restart, go to CMD (Command Prompt) with the Shift + F10 key combination, and give some commands (converting to GPT), but the whole HDD is deleted, the partitions disappear, it remains simple hdd as a purchase, I had to partition again and everything was easy to install afterwards. Below are the commands:
In command prompt write (without quotes):
"Diskpart"
then
List disk
then
"Select disk 0" (select the disk you want to convert, the disk means hdd all)
then
"chub"
then
"Convert gpt"
then
"Exit"
close X and exit CMD (prompt)
Have a Windows stick in the usb, start the installation, follow the normal steps,
give a Refres, check the disk you want to install, eventually partition it if you have something bigger (HDD), if you have 120 or 250 GB SSD you can leave it.
then
click Next and start the installation.
Thank you Cristian, this tutorial helped me a lot.
I just want to edit and ready
good evening! Windows 7 cannot be done, I have other variants! Thank you
Hello Mr. Cristi.
How to do it if you have windows 7? Thank you
A good day
Hello
I successfully used the slideshow tutorial, but in the end I ran into a problem. I deleted all the pictures used in the "photos" application for windows 10, with the intention of putting others, but at that time ALL the folders in the laptop that contained the pictures used in the slideshow were emptied, although they had different names, practically the folders were empty (Luckily I had them in google photos, otherwise I was left without them). I don't know what the cause is, but maybe you can tell me how to delete the photos used in the "photos" application without losing them from the folders I copy them for slideshow. Thank you